how to drill deep holes with auger bit is mostly about control: keeping the bit centered, clearing chips before they bind, and matching speed and torque to the wood and hole depth.
If you have ever watched an auger bit start beautifully, then suddenly wander off line, squeal, or jam so hard you have to reverse it out, you already know “just drill slower” is not a real plan. Deep holes magnify small mistakes, and your drill, bit geometry, and even wood species all start to matter.

This guide focuses on practical technique: what to check before you start, how to keep the hole straight, how to clear chips without fighting the tool, and what to do when the bit stalls. I will also call out the common “looks fine until it isn’t” mistakes that usually show up only after you commit to a deep bore.
Pick the right auger bit and drill setup for deep holes
Deep boring goes smoother when you treat it like a system: bit style, drill type, and accessories all support each other. A great technique cannot fully compensate for a dull lead screw or an underpowered drill.
Bit features that matter more as depth increases
- Sharp lead screw (the threaded tip): pulls the bit in at a controlled rate. If it is dull or packed with pitch, you will push harder, and the bit will heat and wander.
- Clean spurs and cutters: the spurs score the rim, the cutters remove material. When they get nicked, the hole edge tears and chips stop evacuating cleanly.
- Flute design: deeper flutes usually move chips better. Standard ship augers can work, but very deep holes benefit from a bit known for chip ejection.
- Length strategy: if you only need occasional deep holes, an extension can be fine, but long extensions add flex and amplify misalignment.
Drill choice: torque and control beat “max RPM”
A high-torque drill or drill/driver with a low-speed gear helps because auger bits want slower RPM and steady torque. Many cordless drills can do it, but if you are boring large diameters or hardwood, a right-angle drill or heavy-duty model usually feels calmer and safer.
According to OSHA, employers should ensure tools are used as intended and that operators follow safe work practices to reduce injury risk. That translates well to DIY too: use a drill designed for the load, and do not “make it work” with an underpowered setup.
Prep the workpiece so the hole starts straight
Most “my hole drifted” stories start before the trigger pull. You want stability, a clean entry point, and a plan for depth.
- Clamp the work so it cannot rotate or lift. If the auger grabs, the stock will try to spin, especially on larger bits.
- Mark both faces if drilling through. Layout the exit location, not just the entry.
- Use a square as a visual reference: hold a speed square or try square beside the bit to monitor plumb in two directions.
- Decide how you will measure depth: painter’s tape flag on the bit, a depth stop collar, or a marked dowel you can drop in to check progress.
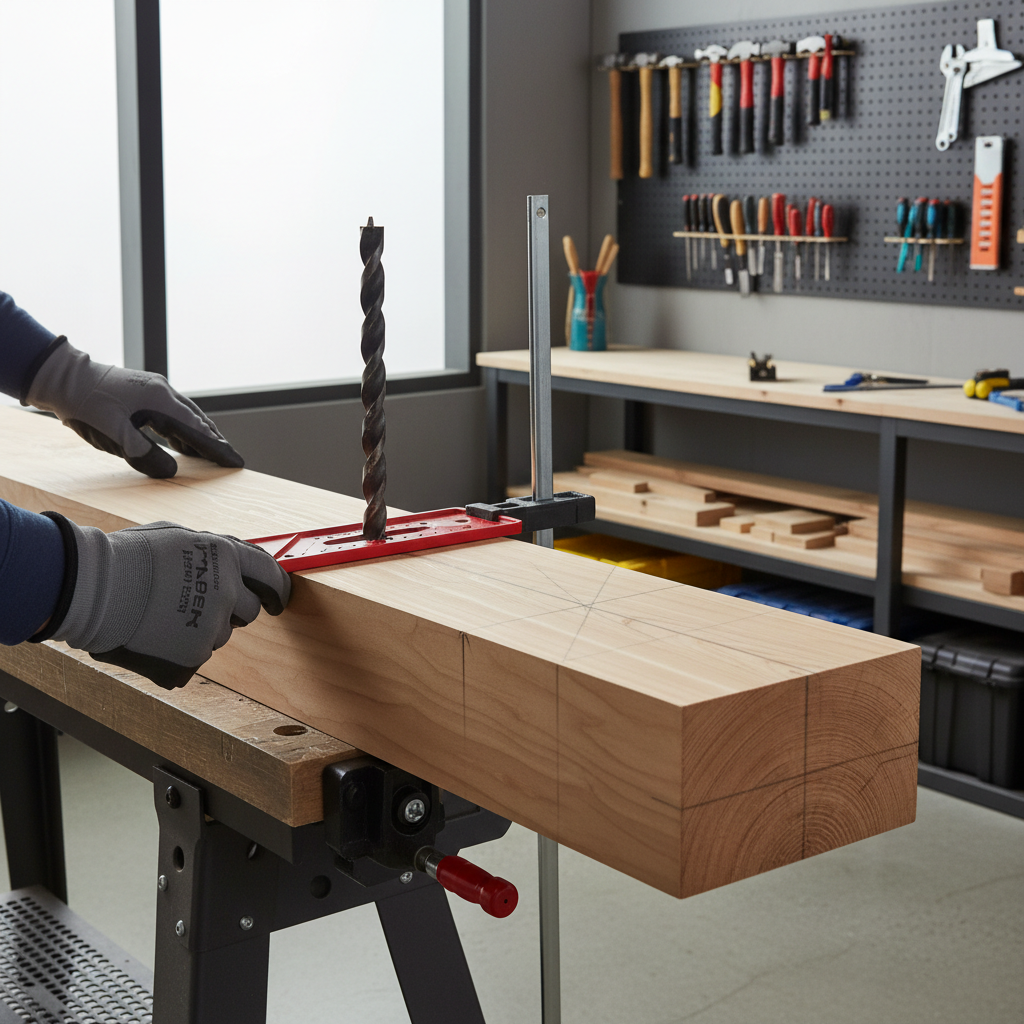
One more quiet detail: check for hidden fasteners. A nail in a deep hole is not only a ruined bit, it can kick the drill hard. If you suspect reclaimed lumber, a quick scan with a magnet or detector can save time.
A quick self-check: what kind of “deep hole problem” do you have?
Before changing tools, identify the failure mode. The fix for wandering is not the same as the fix for chip packing.
- The bit won’t start cleanly: usually lead screw issue, slick surface, or you are starting at an angle.
- The hole drifts off line: often misalignment early, flex from extensions, or pushing too hard.
- It squeals and stalls: commonly chips packed in the flutes, too high RPM, or dull cutters.
- Blowout on the exit side: no backer board, drilling too aggressively at breakthrough.
- Bit gets stuck and won’t reverse out: chips compacted, resin buildup, or a knot grabbing the spurs.
If you recognize more than one, treat chip clearing as the first priority. In deep boring, heat plus packed chips creates a chain reaction that makes everything worse.
Step-by-step: how to drill deep holes with auger bit (cleanly and safely)
This is the method that tends to work across softwood, hardwood, and structural lumber, with small adjustments for bit diameter and drill power.
1) Start slow and let the lead screw do the pulling
Place the lead screw on your mark, bring the drill up to low speed, and let the threads bite. If you push hard at the start, you are more likely to tilt the bit, and that tilt becomes “permanent” as the hole deepens.
2) Drill in short “advance and clear” cycles
For deep holes, do not try to reach depth in one continuous push. Advance a few inches, then back the bit out partially to clear chips. On larger bits or resinous wood, you may need to clear more often than you expect.
- Listen: a smooth cutting sound usually means chips are moving. A rising squeal suggests heat and packing.
- Feel: sudden torque spikes often mean a knot, chip jam, or you are bottoming out.
3) Keep the bit aligned in two planes
Check plumb front-to-back and left-to-right. A fast visual trick is to line up the drill body with a vertical reference behind it, then check again from the side. If you correct late, you create an S-shaped hole rather than a straight one.
4) Manage breakthrough to avoid blowout
If drilling through, slow down as you approach the far face. Ideally, drill until the lead screw just pokes through, then finish from the other side using that small hole as a guide. If flipping the work is not possible, clamp a backer board tight to the exit face.
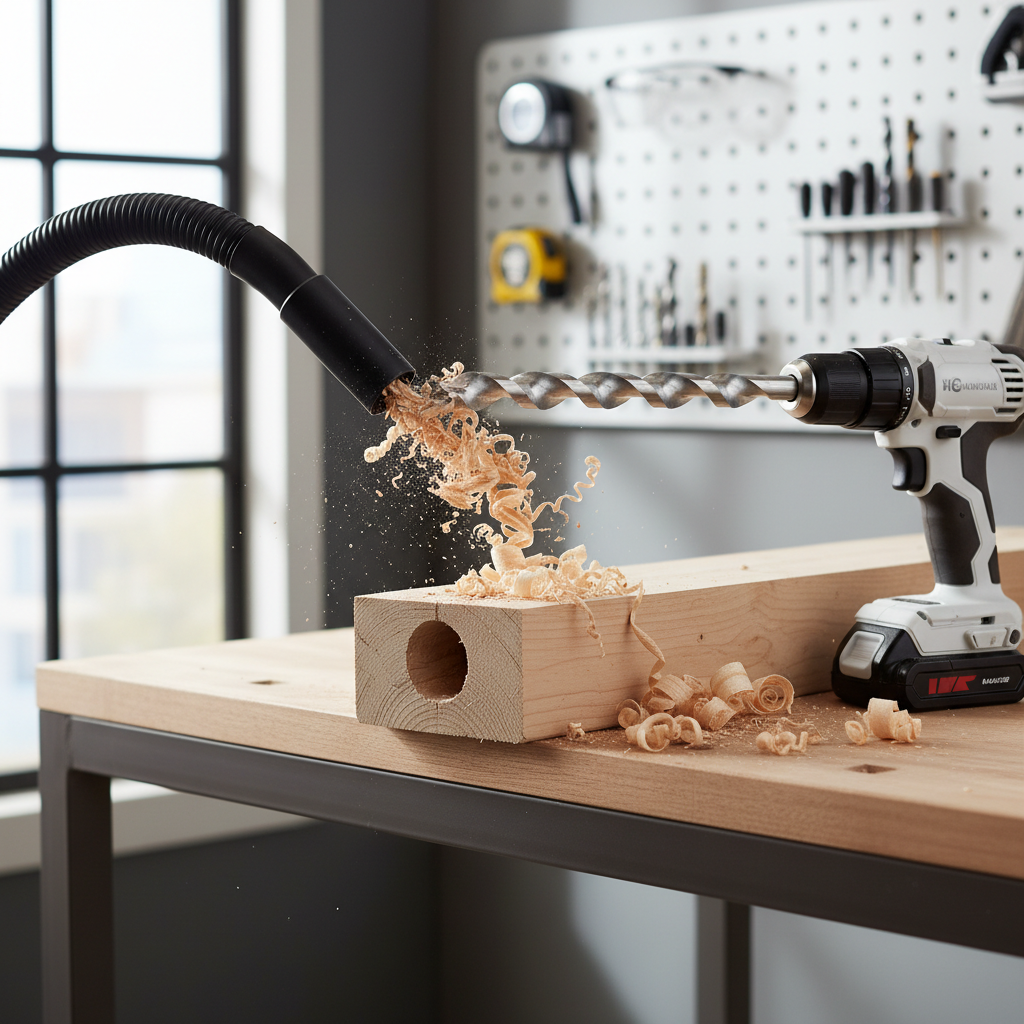
Chip clearing, heat, and stall recovery (where most people get stuck)
When someone says an auger “binds,” it is usually not random. Chips pack in the flutes, friction rises, and the bit effectively wedges itself.
How to clear chips without enlarging the hole
- Back the bit out while it is still spinning slowly, then stop once you see chips eject. This often clears the flute without tearing the rim.
- If chips stop coming, fully reverse out, brush the flutes, and restart gently so the lead screw re-centers.
- In very deep holes, pause and vacuum chips from the entry to keep them from re-entering the cut.
What to do if the bit stalls hard
Release the trigger, keep your wrist braced, then switch to reverse and try to back out slowly. If it does not move, do not “pulse” forward aggressively because that can snap the bit or twist your wrist. In stubborn cases, removing the drill and using a wrench on the bit shank to work it free can be safer, and if you are on a jobsite, asking a pro to help is sensible.
According to NIOSH, power tool injuries often involve sudden torque and loss of control, so treating stalls as a safety moment, not an annoyance, is the right mindset.
If you smell burning wood, treat it as a stop sign. Clear chips, check sharpness, and lower RPM. Pushing through tends to glaze the hole walls and makes the next attempt even harder.
Speed, feed, and technique tweaks by material and bit size
There is no single “correct” RPM, but there are patterns that keep you out of trouble. Bigger diameter, deeper hole, harder wood all push you toward lower speed and more frequent clearing.
| Situation | What you’ll notice | Adjustment that usually helps |
|---|---|---|
| Large diameter (3/4 in. and up) | More torque reaction, chips pack faster | Lower gear, shorter drilling bursts, firmer bracing |
| Hardwood (oak, maple) | Slower cutting, heat builds quickly | Extra chip clearing, verify sharp cutters, avoid high RPM |
| Resinous softwood (pine, fir) | Pitch buildup, sticky chips | Clean flutes more often, consider bit cleaning solution |
| Deep blind hole | Chips have nowhere to go | Back-out cycles, vacuum at entry, consider stepping up in length carefully |
One practical rule: if you have to lean your body weight into the drill to make progress, something is off. In many cases it is chip evacuation, not “lack of power.”
Common mistakes that waste time (and how to avoid them)
- Starting too fast: the lead screw can pull unevenly and the bit can skate. Start slow, then increase only when the hole is established.
- Never clearing chips: deep holes punish this. Clear early, clear often.
- Using long extensions casually: extensions add wobble. If you must use one, keep alignment checks frequent and reduce side pressure.
- Ignoring dullness: an auger can look “fine” but cut poorly. If it burns or chatters, sharpen or replace.
- Breaking through aggressively: exit blowout is avoidable with backers or a two-sided approach.
Key takeaway: deep boring is a rhythm, not a sprint. The cleanest holes usually come from a steady cadence of advancing, clearing, and re-checking alignment.
When it’s worth getting help or switching methods
If you need multiple perfectly straight deep holes for structural work, joinery, or hardware that must line up, consider a drill guide, a portable drill press attachment, or a shop drill press with the right capacity. For construction tasks like running long holes through studs, a right-angle drill plus a self-feed bit might fit the job better than a long auger, depending on access.
If you feel repeated wrist torque, numbness, or you cannot brace safely in the working position, it is smart to consult a professional or change the setup. Safety varies by tool, stance, and material, and a small change in approach can reduce risk.
Conclusion: a simple plan for cleaner deep holes
Deep holes get easier when you stop fighting the bit and start managing chips, alignment, and torque. Use a sharp auger, clamp the work, start slow, drill in clearing cycles, then treat stalls and breakthrough as moments to slow down rather than push harder.
If you want one action to take today, sharpen or replace the auger bit you use most, then practice the “advance and clear” rhythm on scrap before the real piece, it usually pays off fast.